学习时长27h/30,2021-05-19——06-17
1.RabbitMQ简介
linux 安装
使用docker安装
#1.拉取镜像
docker pull rabbitmq:3.7.7-management

#2.查看镜像 id
[root@centos-2 local]# docker images
REPOSITORY   TAG                IMAGE ID       CREATED       SIZE
nginx        <none>             62d49f9bab67   5 weeks ago   133MB
tomcat       latest             bd431ca8553c   5 weeks ago   667MB
rabbitmq     3.7.7-management   2888deb59dfc   2 years ago   149MB

#3.根据下载的镜像创建和启动容器
docker run -d --name rabbitmq3.7.7 -p 5672:5672 -p 15672:15672 -v `pwd`/data:/var/lib/rabbitmq -e RABBITMQ_DEFAULT_USER=admin -e RABBITMQ_DEFAULT_PASS=admin 2888deb59dfc
#参数说明
#说明:
-d 后台运行容器;
--name 指定容器名;
-p 指定服务运行的端口(5672:应用访问端口;15672:控制台Web端口号);
-v 映射目录或文件;
--hostname  主机名(RabbitMQ的一个重要注意事项是它根据所谓的 “节点名称” 存储数据,默认为主机名);
-e 指定环境变量;(RABBITMQ_DEFAULT_VHOST:默认虚拟机名;RABBITMQ_DEFAULT_USER:默认的用户名;RABBITMQ_DEFAULT_PASS:默认用户名的密码)

#4.可以使用浏览器打开web管理端:http://Server-IP:15672
用户名和密码为上设置的admin
1.访问web界面
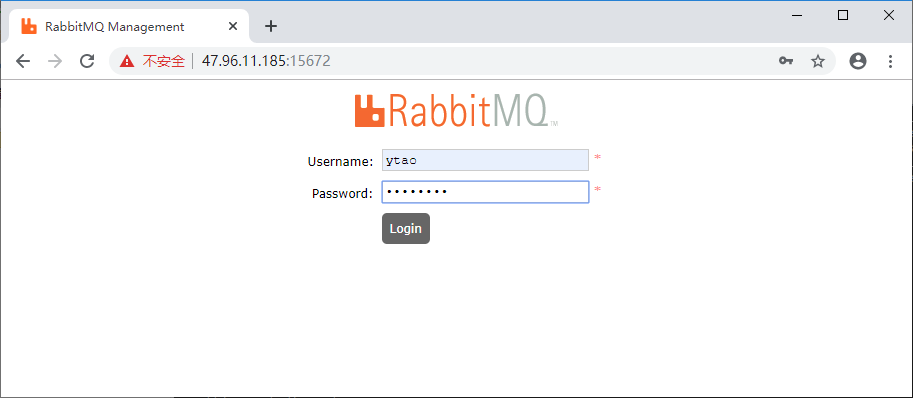
在浏览器 输入你的主机Ip:15672回车即可访问rabbitMq的Web端管理界面,默认用户名和密码都是guest,如图出现如下界面代表已经成功了。
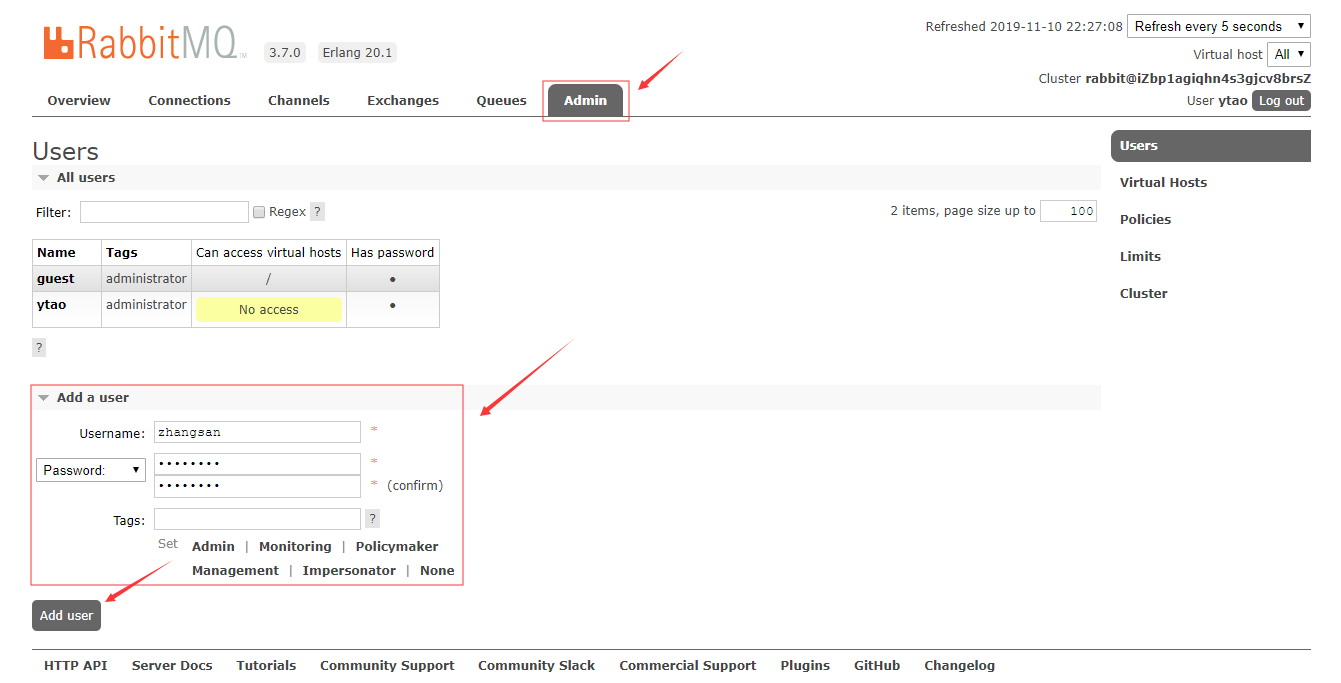
2.新添加一个账户
默认的guest 账户有访问限制,默认只能通过本地网络(如 localhost) 访问,远程网络访问受限,所以在使用时我们一般另外添加用户,例如我们添加一个root用户:
①执行docker exec -i -t 57d bin/bash进入到rabbitMq容器内部
[root@localhost docker]# docker exec -i -t 57d bin/bash
root@3ae75edc48e2:/#
②执行rabbitmqctl add_user root 123456 添加用户,用户名为root,密码为123456
root@3ae75edc48e2:/# rabbitmqctl add_user root 123456
Adding user "root" ...
③执行rabbitmqctl set_permissions -p / root ".*" ".*" ".*" 赋予root用户所有权限
root@3ae75edc48e2:/# rabbitmqctl set_permissions -p / root ".*" ".*" ".*"
Setting permissions for user "root" in vhost "/" ...
④执行rabbitmqctl set_user_tags root administrator赋予root用户administrator角色
root@3ae75edc48e2:/# rabbitmqctl set_user_tags root administrator
Setting tags for user "root" to [adminstrator] ...
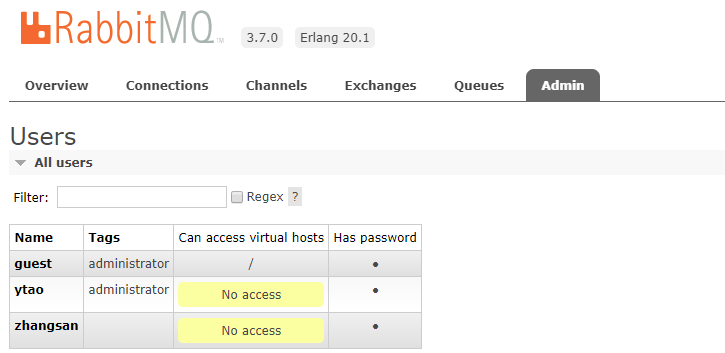
⑤执行rabbitmqctl list_users查看所有用户即可看到root用户已经添加成功
root@3ae75edc48e2:/# rabbitmqctl list_users
Listing users ...
user	tags
guest	[administrator]
root	[administrator]
执行exit命令,从容器内部退出即可。这时我们使用root账户登录web界面也是可以的。到此,rabbitMq的安装就结束了,接下里就实际代码开发。
HelloWorld
1.启动rabbit服务
打开sbin目录,双击rabbitmq-server.bat
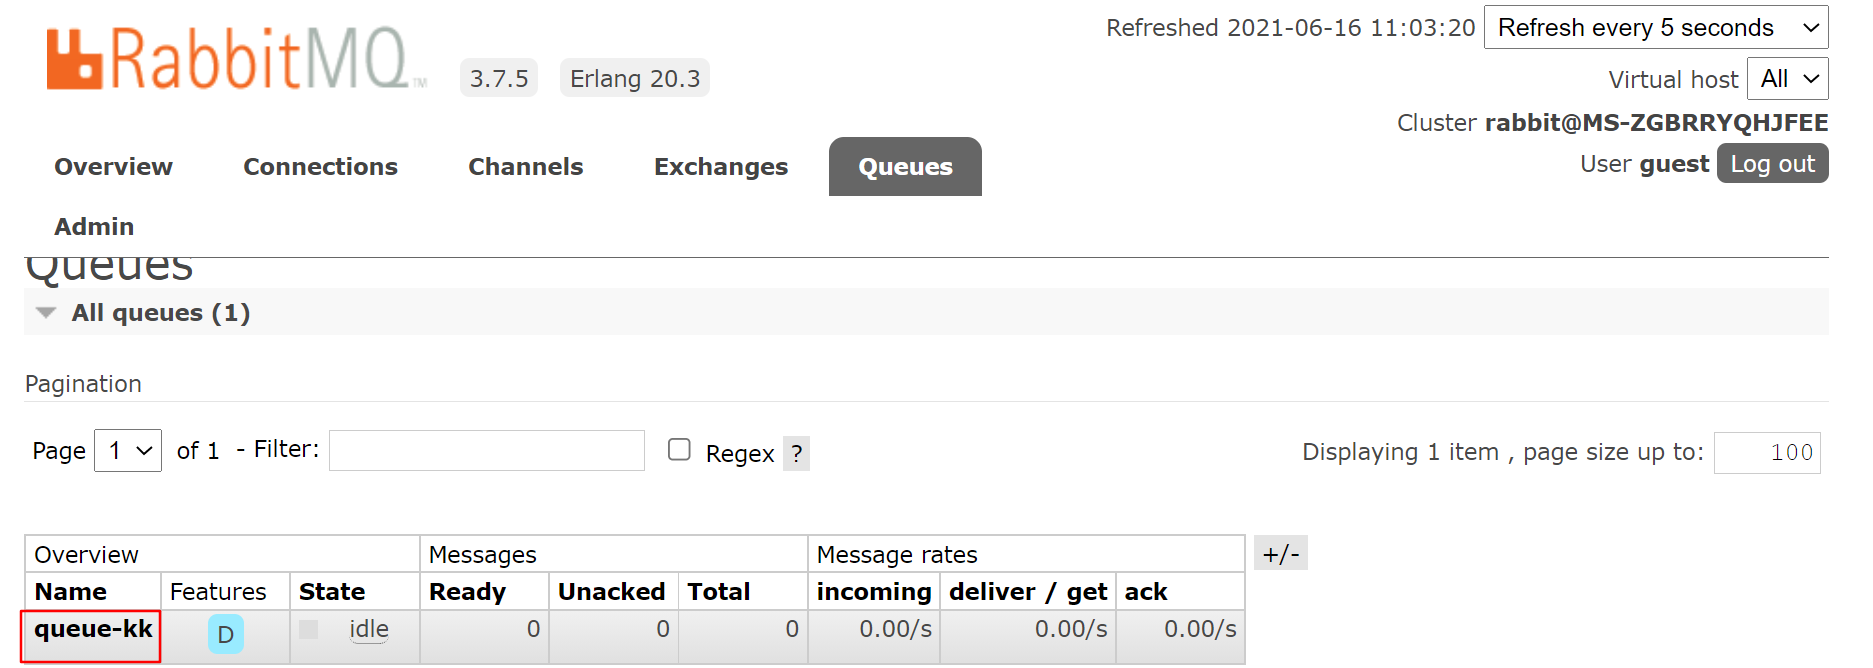
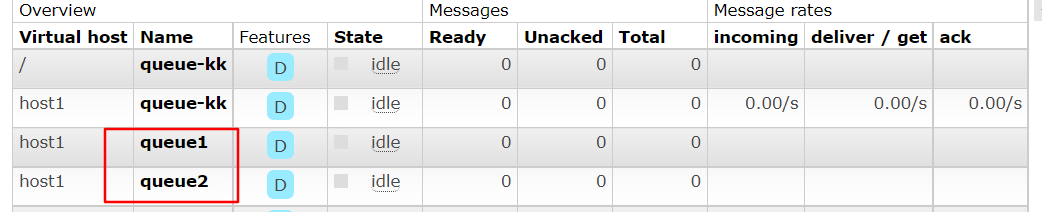
在浏览器中,手动创建一个名为 queue-kk的队列
2.新建一个demo,导入依赖
 <!--# 引入依赖-->
        <!-- https://mvnrepository.com/artifact/com.rabbitmq/amqp-client -->
        <dependency>
            <groupId>com.rabbitmq</groupId>
            <artifactId>amqp-client</artifactId>
            <version>5.2.0</version>
        </dependency>
        <!-- https://mvnrepository.com/artifact/junit/junit -->
        <dependency>
            <groupId>junit</groupId>
            <artifactId>junit</artifactId>
            <version>4.12</version>
        </dependency>
3.演示生产和消费消息
package ppppp.demo;
import com.rabbitmq.client.*;
import org.junit.Test;
import java.io.IOException;
import java.util.concurrent.TimeUnit;
import java.util.concurrent.TimeoutException;

/**
 * @author lppppp
 * @create 2021-05-21 14:58
 */
public class RabbitProducer_Consumer {

    private static final String EXCHANGE_NAME="exchange-kk";
    private static final String ROUTING_KEY="routingkey-kk";
    private static final String QUEUE_NAME="queue-kk";
    private static final String USER_NAME="guest";
    private static final String PASSWORD="guest";
    private static final String IP_ADDRESS="127.0.0.1";
    private static final int PORT=5672; //默认端口号


    @Test
    public void producer() throws IOException, TimeoutException {
        // 创建连接工厂
        ConnectionFactory factory = new ConnectionFactory();
        factory.setHost(IP_ADDRESS);
        factory.setPort(PORT);
        factory.setUsername(USER_NAME);
        factory.setPassword(PASSWORD);
        // 获取新的连接
        Connection connection = factory.newConnection();
        // 创建信道
        Channel channel = connection.createChannel();
        // 创建一个 type="direct"、持久化的、非自动删除的交换器
        channel.exchangeDeclare(EXCHANGE_NAME,"direct",true,false,null);
        // 创建一个持久化、非排他的、非自动删除的交换器
        channel.queueDeclare(QUEUE_NAME,true,false,false,null);
        // 将交换器与队列通过路由键绑定
        channel.queueBind(QUEUE_NAME,EXCHANGE_NAME,ROUTING_KEY);
        String message="hello world";
        // 发送一条持久化的消息
        channel.basicPublish(EXCHANGE_NAME,ROUTING_KEY,MessageProperties.PERSISTENT_TEXT_PLAIN,message.getBytes());
        // 关闭信道
        channel.close();
        // 关闭资源
        connection.close();
    }

    @Test
    public void consumer() throws IOException, TimeoutException, InterruptedException {
        Address[] addresses = {new Address(IP_ADDRESS, PORT)};
        ConnectionFactory factory=new ConnectionFactory();
        factory.setUsername(USER_NAME);
        factory.setPassword(PASSWORD);
        Connection connection = factory.newConnection(addresses);
        final Channel channel = connection.createChannel();
        // 设置客户端最多接收未被ack的消息的个数
        channel.basicQos(64);
        DefaultConsumer consumer = new DefaultConsumer(channel) {
            // 客户端接收后如何处理消息
            @Override
            public void handleDelivery(String consumerTag, Envelope envelope, AMQP.BasicProperties properties, byte[] body) throws IOException {
                System.out.println("rev message:"+new String(body));
                // 确认收到消息
                channel.basicAck(envelope.getDeliveryTag(),false);
            }
        };
        channel.basicConsume(QUEUE_NAME,consumer);
        // 等到回调函数完成后关闭连接
        TimeUnit.SECONDS.sleep(2);
        channel.close();
        connection.close();
    }

}
2.用户管理
1.用户级别
- 超级管理员administrator,可以登录控制台,查看所有信息,可以对用户和策略进行操作
- 监控者monitoring,可以登录控制台,可以查看节点的相关信息,比如进程数,内存磁盘使用情况
- 策略制定者policymaker ,可以登录控制台,制定策略,但是无法查看节点信息
- 普通管理员 management 仅能登录控制台
- 其他, 无法登录控制台,一般指的是提供者和消费者
2.添加用户(命令模式)
-
添加/配置用户
# 插件目录 ./rabbitmqctl add_user ytao admin123 -
设置用户权限
#设置admin为administrator级别
./rabbitmqctl set_user_tags ytao administrator
3.添加用户(web方式)
-
浏览器访问:http://127.0.0.1:15672/ (使用guest guest 登录, guest 具有最高权限,只能在本机登录;先使用命令行创建一个用户)
-
添加用户
-
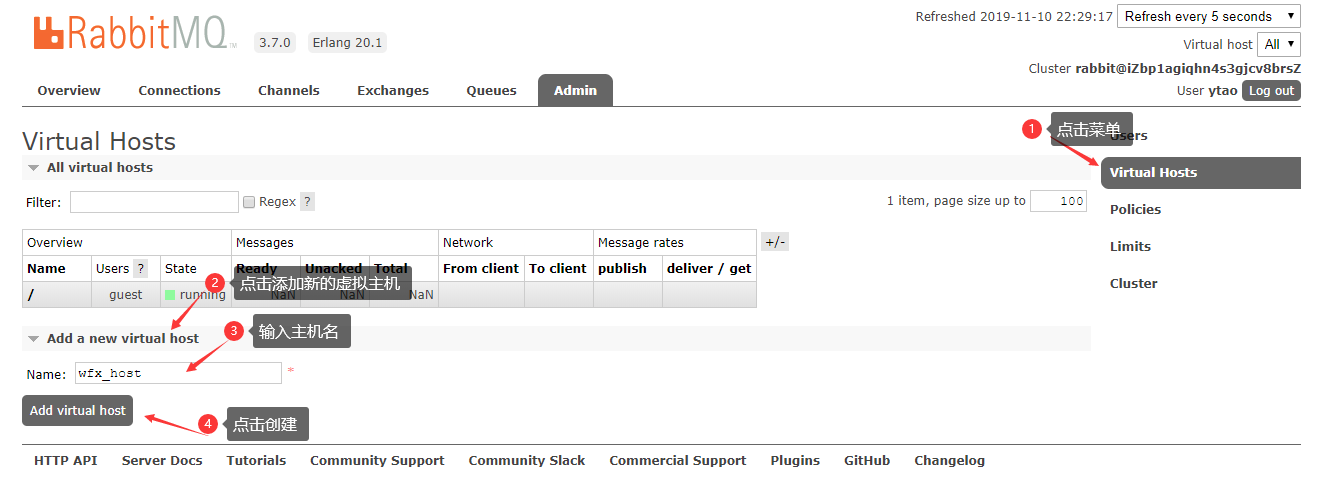
为用户分配可以访问的虚拟主机
-
默认情况下没有任何可以访问的,我们可以添加一个主机(相当于添加一个数据库),然后分配权限
-
创建虚拟主机
-
给指定用户分配虚拟主机
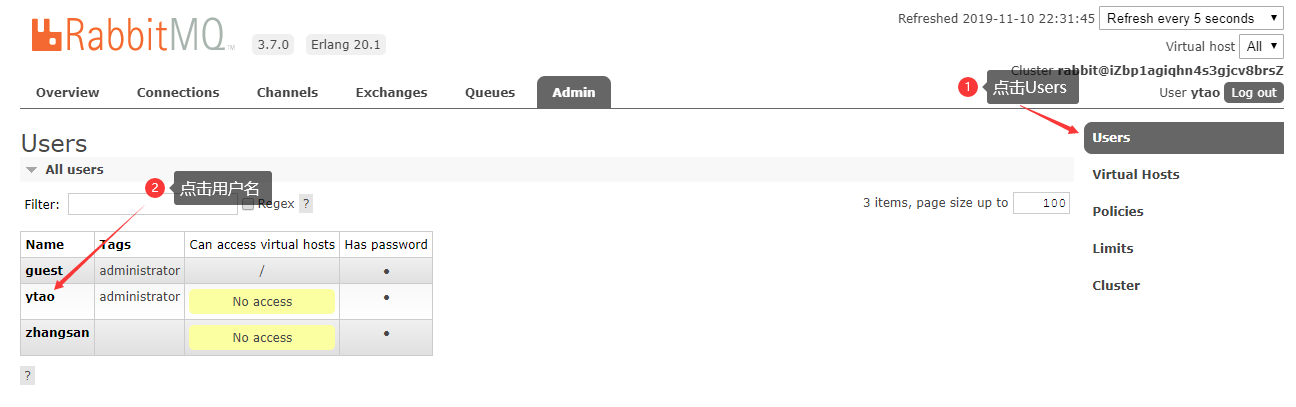
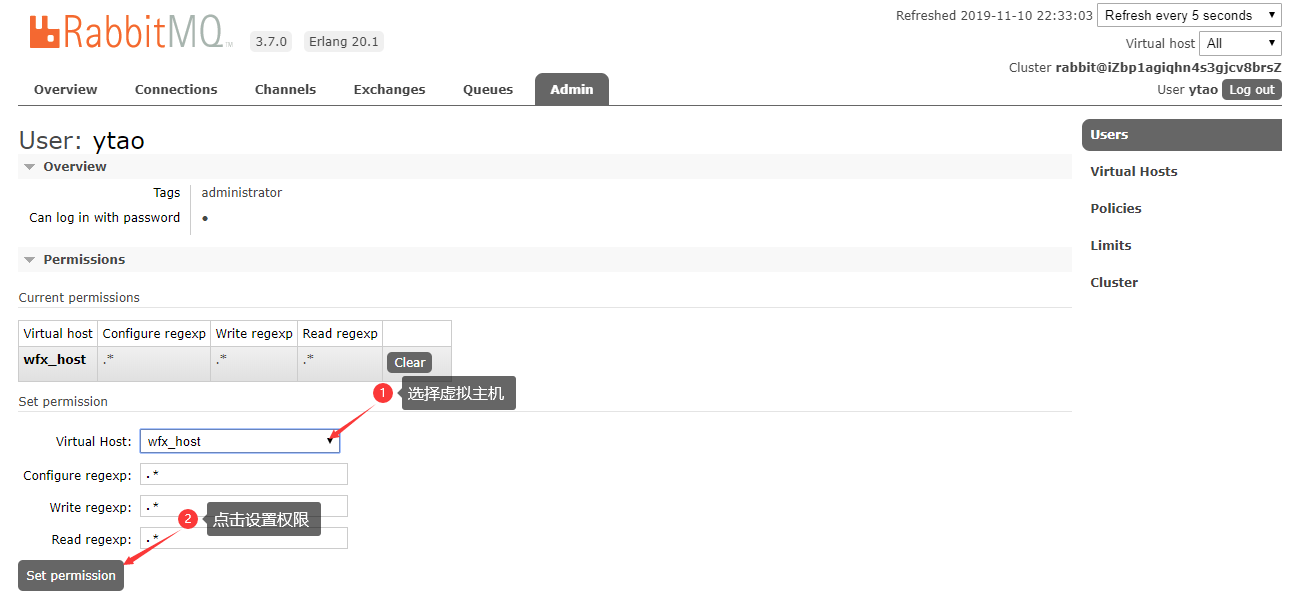
-
设置完成后,回到用户界面确认

-
3.消息队列的模式
1.简单模式
简单模式就是我们的生产者将消息发到队列,消费者从队列中取消息,一条消息对应一个消费者
2.工作模式
Work模式就是一条消息可以被多个消费者尝试接收,但是最终只能有一个消费者能获取

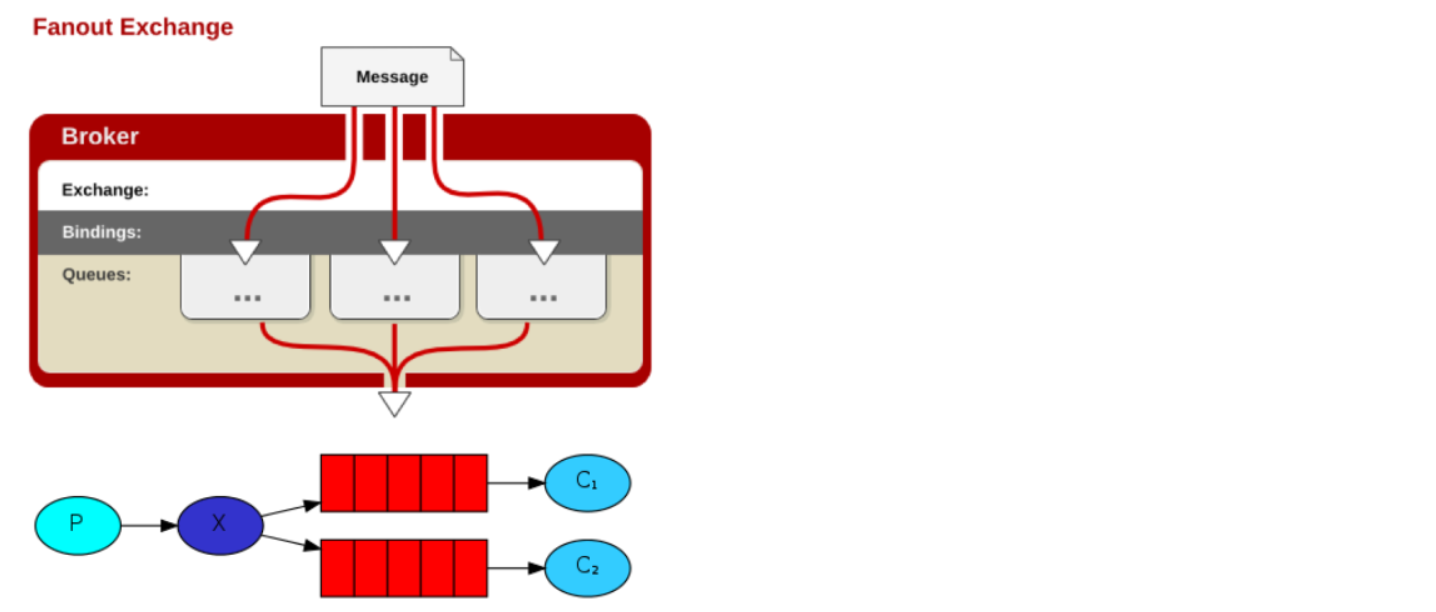
3.订阅模式
一条消息可以被多个消费者同时获取,生产者将消息发送到交换机,消费者将自己对应的队列注册到交换机,当发送消息后所有注册的队列的消费者都可以收到消息
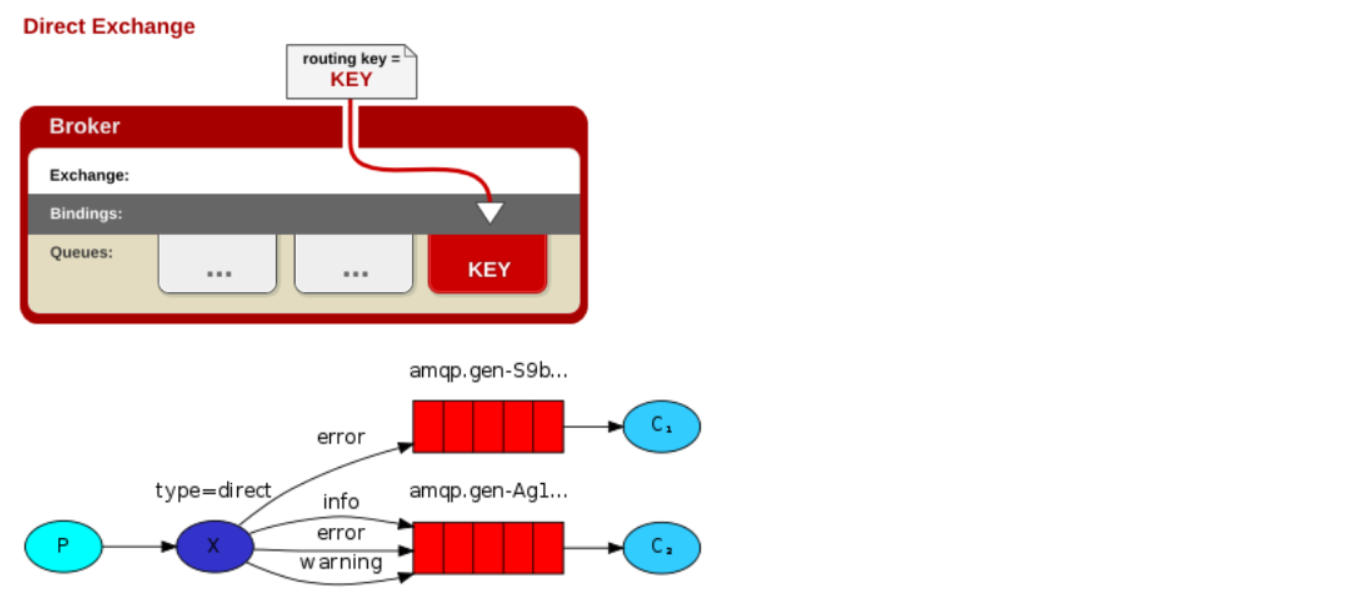
4.路由模式
生产者将消息发送到了type为direct模式的交换机,消费者的队列在将自己绑定到路由的时候会给自己绑定一个key,只有消费者发送对应key格式的消息时候队列才会收到消息
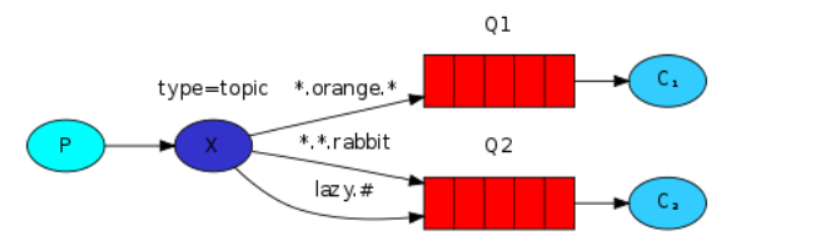
5.Topic模式
将消息路由到BindingKey和RountingKey 相匹配的队列中,匹配规则约定:
- RountingKey 和 BindingKey 均为一个点“.”分隔得字符串,被点号分隔得每一段独立的字符串称为一个单词。
- BindingKey 中可以存在两种特殊的字符串“#”和“”,其中“”用于匹配一个单词,“#”用于匹配零个或者多个单词。
- * (star) can substitute for exactly one word.
- # (hash) can substitute for zero or more words.
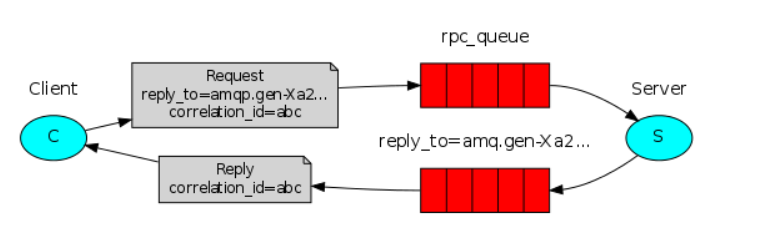
6.RPC模式
 1
1

4.普通Maven应用使用RabbitMQ
-
创建Maven项目
-
添加依赖
<dependency> <groupId>com.rabbitmq</groupId> <artifactId>amqp-client</artifactId> <version>4.5.0</version> </dependency> <dependency> <groupId>org.slf4j</groupId> <artifactId>slf4j-log4j12</artifactId> <version>1.7.25</version> </dependency> <dependency> <groupId>org.apache.commons</groupId> <artifactId>commons-lang3</artifactId> <version>3.3.2</version> </dependency> <!--整合到spring项目需要导入此依赖--> <dependency> <groupId>org.springframework.amqp</groupId> <artifactId>spring-rabbit</artifactId> <version>1.7.6.RELEASE</version> </dependency> -
创建日志配置文件 log4j.properties
log4j.rootLogger=DEBUG,A1 log4j.logger.com.taotao = DEBUG log4j.logger.org.mybatis = DEBUG log4j.appender.A1=org.apache.log4j.ConsoleAppender log4j.appender.A1.layout=org.apache.log4j.PatternLayout log4j.appender.A1.layout.ConversionPattern=%-d{yyyy-MM-dd HH:mm:ss,SSS} [%t] [%c]-[%p] %m%n -
创建帮助类
package com.qfedu.utils;

import com.rabbitmq.client.Connection;
import com.rabbitmq.client.ConnectionFactory;

public class ConnectionUtil {
     public static Connection getConnection() throws Exception {
          //定义连接工厂
          ConnectionFactory factory = new ConnectionFactory();
          // 设置服务地址
          factory.setHost("47.96.11.185");
          //端口
          factory.setPort(5672);
          // 设置账号信息,用户名、密码、vhost
          factory.setVirtualHost("host1");
          factory.setUsername("ytao");
          factory.setPassword("admin123");
          // 通过工程获取连接
          Connection connection = factory.newConnection();
          return connection;
     }

}
发送消息
package com.qfedu.send;

import com.qfedu.utils.ConnectionUtil;
import com.rabbitmq.client.Channel;
import com.rabbitmq.client.Connection;

public class Send {

    public static void main(String[] argv) throws Exception {
        // 获取到连接以及mq通道
        Connection connection = ConnectionUtil.getConnection();
        // 相当于数据库中的创建连接
        // 从连接中创建通道
        Channel channel = connection.createChannel();
        // 相当于数据库中的 statement
        // 声明(创建)队列,如果存在就不创建,不存在就创建
        // 参数1 队列名,
        // 参数2 durable: 是否持久化, 队列的声明默认是存放到内存中的,如果rabbitmq重启会丢失,如果想重启之后还存在就要使队列持久化,保存到Erlang自带的Mnesia数据库中,当rabbitmq重启之后会读取该数据库
        // 参数3 exclusive:是否排外的,有两个作用,一:当连接关闭时connection.close()该队列是否会自动删除; 二:该队列是否是私有的private,如果不是排外的,可以使用两个消费者都访问同一个队列,没有任何问题,如果是排外 的,会对当前队列加锁,其他通道channel是不能访问的,如果强制访问会报异常: com.rabbitmq.client.ShutdownSignalException: channel error; protocol method: #method<channel.close>(reply-code=405, reply-text=RESOURCE_LOCKED - cannot obtain exclusive access to locked queue 'queue_name' in vhost '/', class-id=50, method-id=20)一般等于true的话 用于一个队列只能有一个消费者来消费的场景
        // 参数4 autoDelete:是否自动删除,当最后一个消费者断开连接之后队列是否自动被删除,可以通过RabbitMQ Management,查看某个队列的消费者数量,当consumers = 0时队列就会自动删除
        // 参数5 arguments:  参数
        //channel.queueDeclare("queue1", false, false, true, null);
        // 消息内容
         String message = "Hello World!";
        // 参数1 交换机,此处无
        // 参数2 发送到哪个队列
        // 参数3 属性
        // 参数4 内容
         channel.basicPublish("", "queue1", null, message.getBytes());
        // 将消息发动到数据库
         System.out.println(" 发送数据 '" + message + "'");
        //关闭通道和连接
         channel.close();
         connection.close();
    }
}
消费消息
package com.qfedu.receive;

import com.qfedu.utils.ConnectionUtil;
import com.rabbitmq.client.*;

import java.io.IOException;

public class Receive {

    public static void main(String[] argv) throws Exception {
        //创建一个新的连接
        Connection connection = ConnectionUtil.getConnection();
        //创建一个通道
        Channel channel = connection.createChannel();

        //声明要关注的队列
        //channel.queueDeclare("queue1", false, false, false, null);
        //DefaultConsumer类实现了Consumer接口,通过传入一个频道,
        // 告诉服务器我们需要那个频道的消息,如果频道中有消息,就会执行回调函数handleDelivery
        Consumer consumer = new DefaultConsumer(channel) {
            public void handleDelivery(String consumerTag, Envelope envelope,
                                       AMQP.BasicProperties properties, byte[] body)
                    throws IOException {
                String message = new String(body, "UTF-8");
                System.out.println("Customer Received '" + message + "'");
            }
        };
        //自动回复队列应答 -- RabbitMQ中的消息确认机制
        channel.basicConsume("queue1", true, consumer);
    }
}
5.在springboot中使用MQ
5.1消息生产者
Springbootl应用可以完成自动配置及依赖注入ーー可以通过 Spring.直接提供与MQ的连接对象
添加依赖
 <dependencies>
        <dependency>
            <groupId>org.springframework.boot</groupId>
            <artifactId>spring-boot-starter-amqp</artifactId>
        </dependency>
        <dependency>
            <groupId>org.springframework.boot</groupId>
            <artifactId>spring-boot-starter-thymeleaf</artifactId>
        </dependency>
        <dependency>
            <groupId>org.springframework.boot</groupId>
            <artifactId>spring-boot-starter-web</artifactId>
        </dependency>

        <dependency>
            <groupId>org.projectlombok</groupId>
            <artifactId>lombok</artifactId>
            <optional>true</optional>
        </dependency>
        <dependency>
            <groupId>org.springframework.boot</groupId>
            <artifactId>spring-boot-starter-test</artifactId>
            <scope>test</scope>
        </dependency>
        <dependency>
            <groupId>org.springframework.amqp</groupId>
            <artifactId>spring-rabbit-test</artifactId>
            <scope>test</scope>
        </dependency>
    </dependencies>
配置yml文件
server:
  port: 8080
spring:
  application:
    name: producer
  rabbitmq:
    host: 127.0.0.1
    port: 5672
    virtual-host: host1
    username: kk
    password: kk
Controller
package ppppp.producer.controller;

import org.springframework.web.bind.annotation.RequestMapping;
import org.springframework.web.bind.annotation.RestController;
import ppppp.producer.service.MQService;

import javax.annotation.Resource;

@RestController
public class DemoCtroller {
    @Resource
    private MQService mqService;

    @RequestMapping("test")
    public String demo(String msg){
        mqService.sendMsg(msg);
        return "success";
    }
}
MQService
package ppppp.producer.service;

import org.springframework.amqp.core.AmqpTemplate;
import org.springframework.stereotype.Service;

import javax.annotation.Resource;

@Service
public class MQService {

    @Resource
    private  AmqpTemplate amqpTemplate;
    public void sendMsg(String msg) {
        if(msg.startsWith("q_")){
            //1. 发送消息到队列
            amqpTemplate.convertAndSend("queue-kk",msg);
        }else if(msg.startsWith("f_")){
            //2. 发送消息到订阅交换机
            amqpTemplate.convertAndSend("ex1","",msg);
        }else if(msg.startsWith("r_")){
            //3. 发送消息到路由交换机
            if(msg.startsWith("r_a")){
                amqpTemplate.convertAndSend("ex2","a",msg);
            }else if(msg.startsWith("r_b")){
                amqpTemplate.convertAndSend("ex2","b",msg);
            }
        }
    }
}
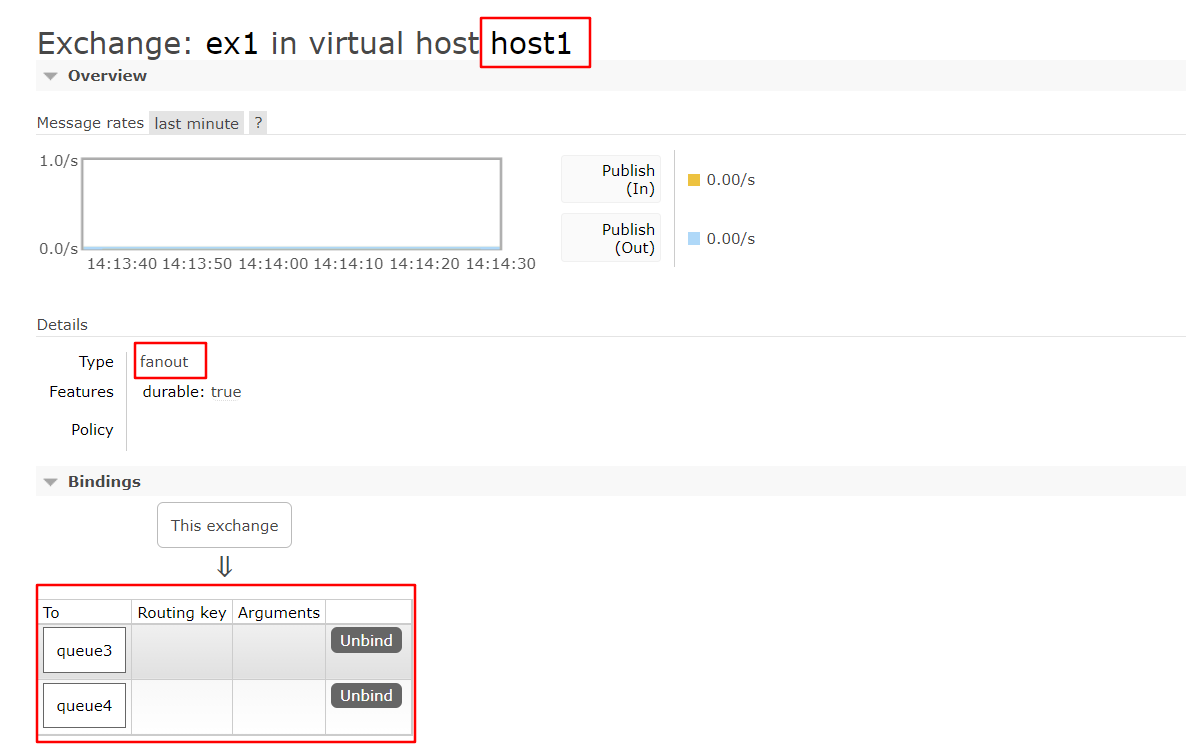
配置交换机和队列进行绑定
1.直接发送到队列
当浏览器发送的消息为 q_时,只有 queue-kk 能收到消息
2.交换机的订阅模式:
queue3和queue4都与交换机ex1进行了绑定,当浏览器发送的消息为 f_时,queue3和queue4都能收到消息
3.路由模式
queue5和queue6都与交换机ex2进行了绑定
- 当浏览器发送的消息为==r_a==时,与之绑定的queue5能收到消息
- 当浏览器发送的消息为 ==r_b==时,与之绑定的queue5能收到消息

5.2消息消费者
-
添加依赖
-
配置yml文件
server:
  port: 8081
spring:
  application:
    name: consumer
  rabbitmq:
    host: 127.0.0.1
    port: 5672
    virtual-host: host1
    username: kk
    password: kk
-
编写 service接受指定队列的消息
package ppppp.consumer.service;

import org.springframework.amqp.rabbit.annotation.RabbitHandler;
import org.springframework.amqp.rabbit.annotation.RabbitListener;
import org.springframework.stereotype.Service;

@Service
@RabbitListener(queues = "queue-kk")
public class ReceiveMsg {
    @RabbitHandler
    public void receiveMsg(String msg){
        System.out.println("接收到的消息为 :"+msg);
    }
}
6.使用RabbitMQ发送-接收对象
- Rabbitmq是消息队列,发送和接收的都是字符串/字节数组类型的消息
1.对象序列化实现
- bean实现序列化接口
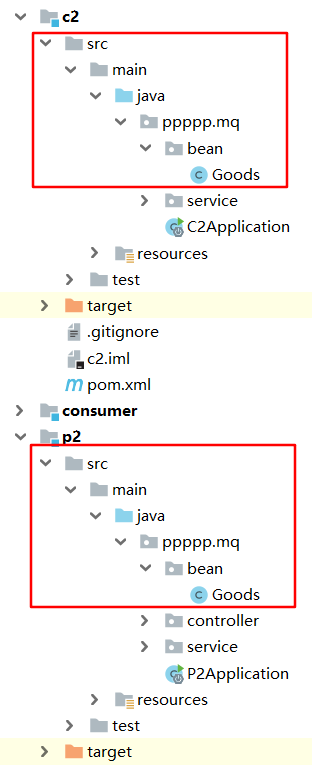
- 要求:传递的对象的包名、类名、属性名必须一致(在生产者和消费者中的bean要一致)
-
消息生产者
package ppppp.mq.service; import org.springframework.amqp.core.AmqpTemplate; import org.springframework.beans.factory.annotation.Autowired; import org.springframework.stereotype.Service; import ppppp.mq.bean.Goods; @Service public class MQService { @Autowired private AmqpTemplate amqpTemplate; public void sendMsg(Goods goods){ //消息队列可以发送字符串、字节数组、序列化对象 amqpTemplate.convertAndSend("","queue-kk",goods); } } -
消息消费者
package ppppp.mq.service;

import org.springframework.amqp.rabbit.annotation.RabbitHandler;
import org.springframework.amqp.rabbit.annotation.RabbitListener;
import org.springframework.stereotype.Service;
import ppppp.mq.bean.Goods;

@Service
@RabbitListener(queues = "queue-kk")
public class ReceiveController {

    @RabbitHandler
    public void receiveMQ(String msg){
        System.out.println("String ---  " + msg);
    }

    @RabbitHandler
    public void receiveMQ(byte[] msg){
        System.out.println("byte[] ---  " + msg);
    }

    @RabbitHandler
    public void receiveMQ(Goods goods){
        System.out.println("goods ---  " + goods);
    }
}
使用序列化字节数组
// 1.生产者
package ppppp.mq.service;

import org.springframework.amqp.core.AmqpTemplate;
import org.springframework.beans.factory.annotation.Autowired;
import org.springframework.stereotype.Service;
import org.springframework.util.SerializationUtils;
import ppppp.mq.bean.Goods;

@Service
public class MQService {
    @Autowired
    private AmqpTemplate amqpTemplate;

    public void sendMsg(Goods goods){
        byte[] serializeGoods = SerializationUtils.serialize(goods);
        amqpTemplate.convertAndSend("","queue-kk",serializeGoods);
    }
}

//2.消费者
@RabbitHandler
    public void receiveMQ(byte[] msg){
        //System.out.println("byte[] ---  " + msg);
        Goods goods = (Goods) SerializationUtils.deserialize(msg);
        System.out.println("byte[] ---  " + goods);
    }
2.JSON字符串实现
要去 对象的属性名要一致
-
消息生产者
@Service public class SendMsgService { @Autowired private AmqpTemplate amqpTemplate; public void sendMsg(Goods goods) throws JsonProcessingException { ObjectMapper mapper=new ObjectMapper(); String message=mapper.writeValueAsString(goods); amqpTemplate.convertAndSend("queue1",message); } } -
消息消费者
@Service
@RabbitListener(queues = "queue1")
public class ReviceMsgService {

    @RabbitHandler
    public void receiveMsg(String msg) throws JsonProcessingException {
        ObjectMapper mapper=new ObjectMapper();
        Goods goods=mapper.readValue(msg,Goods.class);
        System.out.println(goods);
    }

}
7、基于Java的交換机与队列创建
我们使用消息队列,消息队列和交换机可以通过管理系统完成创建,也可以在应用程序中通过Java代码来完成创建
Java代码管理
-
交换机、队列创建及绑定
//1. 新建队列
//参数1:queue - 指定队列的名称
//参数2:durable - 当前队列是否需要持久化(true)
//参数3:exclusive - 是否排外(conn.close() - 当前队列会被自动删除,当前队列只能被一个消费者消费)
//参数4:autoDelete - 如果这个队列没有消费者在消费,队列自动删除
//参数5:arguments - 指定当前队列的其他信息
channel.queueDeclare("queue1",true,false,false,null);
channel.queueDeclare("queue2",true,false,false,null);
//2. 创建exchange
//参数1: exchange的名称
//参数2: 指定exchange的类型  FANOUT - pubsub ,   DIRECT - Routing , TOPIC - Topics
channel.exchangeDeclare("ex3", BuiltinExchangeType.FANOUT);
channel.exchangeDeclare("ex4", BuiltinExchangeType.DIRECT);

//3.绑定某一个队列到交换机
channel.queueBind("queue1","pubsub-exchange","");
channel.queueBind("queue1","pubsub-exchange","r1");
channel.queueBind("queue2","pubsub-exchange","r2");
使用代码成功的创建了交换机和队列

SpringBoot Java配置管理
-
配置RabbitMQ创建队列(Quence)
@Configuration
public class RabbitMQConfiguration {

    @Bean
    public Queue queue() {
        return new Queue("wfx-quence");
    }

    @Bean
    public Queue fanoutQuence() {
        return new Queue("wfx-fanout-quence");
    }
    /**
     * 声明交换机,fanout 类型
     */
    @Bean
    public FanoutExchange fanoutExchange() {
        FanoutExchange fanoutExchange = new FanoutExchange("fanoutExchange");
        return fanoutExchange;
    }
    /**
     * 将队列和交换机绑定
     */
    @Bean
    public Binding bindingFanoutExchange(Queue fanoutQuence, FanoutExchange fanoutExchange) {
        return BindingBuilder.bind(fanoutQuence).to(fanoutExchange);
    }


    @Bean
    public Queue directQuence1() {
        return new Queue("wfx-direct-quence1");
    }
    @Bean
    public Queue directQuence2() {
        return new Queue("wfx-direct-quence2");
    }
    /**
     * 声明交换机,direct 类型
     */
    @Bean
    public DirectExchange directExchange() {
        DirectExchange directExchange = new DirectExchange("directExchange");
        return directExchange;
    }
    /**
     * 将队列和交换机绑定
     */
    @Bean
    public Binding bindingDirectExchange(Queue directQuence1, DirectExchange directExchange) {
       return BindingBuilder.bind(directQuence1).to(directExchange).with("rk1");
    }

    @Bean
    public Binding bindingDirectExchange2(Queue directQuence2, DirectExchange directExchange) {
        return BindingBuilder.bind(directQuence2).to(directExchange).with("rk2");
    }

}
8.消息的可靠性
1.RabbitMQ事务
当在消息发送过程中添加了事务,处理效率降低几十倍甚至上百倍
//1.开启事务
channel.txSelect();

//2.提交事务
channel.txCommit();

//3.事务回滚
channel.txRollback();
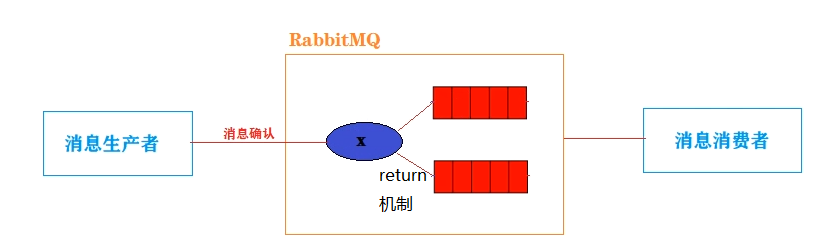
2.消息确认机制
消息确认机制 和 return机制
消息确认机制:确认消息提供者是否成功发送消息到交换机
return机制:确认消息是否成功的从交换机分发到队列
2.1普通Maven项目的消息确认
2.1.1 普通confirm方式
Connection connection = ConnectionUtil.getConnection();
Channel channel = connection.createChannel();
String message = "Hello World!";

//1.开启消息确认
channel.confirmSelect();
//2.发送消息
channel.basicPublish("ex2", "c", null, message.getBytes());
//3.获取确认
boolean b = channel.waitForConfirms();
System.out.println("消息发送"+(b?"成功":"失败"));

channel.close();
connection.close();
2.1.2 批量confirm方式
Connection connection = ConnectionUtil.getConnection();
Channel channel = connection.createChannel();
String message = "Hello World!";

//1.开启消息确认
channel.confirmSelect();
//2.发送消息
for (int i=1; i<=10; i++) {
    message += i;
    channel.basicPublish("ex2", "c", null, message.getBytes());
}
//3.批量确认:发送的所有消息中有一个失败就直接全部失败,抛出IO异常
boolean b = channel.waitForConfirms();

channel.close();
connection.close();
2.1.3 异步confirm方式
Connection connection = ConnectionUtil.getConnection();
Channel channel = connection.createChannel();
String message = "Hello World!";

//1.开启消息确认
channel.confirmSelect();
//2.发送消息
for (int i=1; i<=10; i++) {
    message += i;
    channel.basicPublish("ex2", "c", null, message.getBytes());
}

//3.开启异步confirm
channel.addConfirmListener(new ConfirmListener() {
    //参数l表示返回的消息标识,参数b表示是否为批量confirm
    public void handleAck(long l, boolean b) throws IOException {
        System.out.println("----消息发送成功");
    }
    public void handleNack(long l, boolean b) throws IOException {
        System.out.println("----消息发送失败");
    }
});

channel.close();
connection.close();
2.1.4 return机制
- 发送消息之前开启return机制
- 发送消息时指定mandatory参数为true
- 由于return机制是异步处理,所以在发送消息之后不关闭channel
@Test
public void T_异步批量发送消息() throws Exception {
    Connection connection = getConnection();
    Channel channel = connection.createChannel();
    String message = "Hello World!";

    //1.开启消息确认
    channel.confirmSelect();

    //3.开启异步confirm
    channel.addConfirmListener(new ConfirmListener() {
        //参数l表示返回的消息标识,
        //参数b表示是否为批量confirm
        public void handleAck(long l, boolean b) throws IOException {
            System.out.println("----消息发送成功");
        }
        public void handleNack(long l, boolean b) throws IOException {
            System.out.println("----消息发送失败");
        }
    });

    //4.添加return监控
    channel.addReturnListener(new ReturnListener() {
        //消息未分发到队列中时,会执行此语句
        @Override
        public void handleReturn(int replyCode,
                                 String replyText,
                                 String exchange,
                                 String routingKey,
                                 AMQP.BasicProperties properties, byte[] body) throws IOException {
            System.out.println("发送失败*****");
            System.out.println("replyCode————"+replyCode);
            System.out.println("replyText————"+replyText);
            System.out.println("exchange————"+exchange);
            System.out.println("routingKey————"+routingKey);
            System.out.println("body————"+new String(body));
        }
    });

    //2.发送消息
    for (int i=1; i<=10; i++) {
        message += i;
        //channel.basicPublish("ex2", "c", null, message.getBytes());
        channel.basicPublish("ex2", "c",true, null, message.getBytes());
    }
    channel.close();
    connection.close();
}
2.2 SpringBoot应用消息确认
2.2.1 配置application.yml(其他配置省略)
spring:
  rabbitmq:
    publisher-confirm-type: simple  #开启消息确认
    publisher-returns: true			#开启消息返回
2.2.2 开启confirm和return监听
package com.qfedu.mq_producer.utils;

import org.slf4j.Logger;
import org.slf4j.LoggerFactory;
import org.springframework.amqp.core.Message;
import org.springframework.amqp.rabbit.connection.CorrelationData;
import org.springframework.amqp.rabbit.core.RabbitTemplate;
import org.springframework.stereotype.Component;

import javax.annotation.PostConstruct;
import javax.annotation.Resource;

@Component
public class PublisherConfireAndReturnConfig implements RabbitTemplate.ConfirmCallback, RabbitTemplate.ReturnCallback {

    Logger logger = LoggerFactory.getLogger(PublisherConfireAndReturnConfig.class);

    @Resource
    private RabbitTemplate rabbitTemplate;

    @PostConstruct
    public void initMethod(){
        rabbitTemplate.setConfirmCallback(this);
        rabbitTemplate.setReturnCallback(this);
    }

    @Override
    public void confirm(CorrelationData correlationData, boolean ack, String s) {
        if(ack){
            logger.info("--------消息发送(到交换机)成功");
        }else{
            logger.warn("--------消息发送(到交换机)失败");
        }
    }

    @Override
    public void returnedMessage(Message message, int i, String s, String s1, String s2) {
        logger.info("~~~~~~~~消息发送到交换机但未分发到队列!!!");
    }
}
3RabbitMQ的集群部署
3.避免消息重复消费
重复消费消息,会对非幂等行操作造成问题 重复消费消息的原因是,消费者没有给RabbitMQ一个ack
为了解决消息重复消费的问题,可以采用Redis,在消费者消费消息之前,现将消息的id放到Redis中,
id-0(正在执行业务)
id-1(执行业务成功)
如果ack失败,在RabbitMQ将消息交给其他的消费者时,先执行setnx,如果key已经存在,获取他的值,如果是0,当前消费者就什么都不做,如果是1,直接ack。
极端情况:第一个消费者在执行业务时,出现了死锁,在setnx的基础上,再给key设置一个生存时间。
3.1普通Maven项目避免重复消费
- 生产者,发送消息时,指定messageId
AMQP.BasicProperties properties = new AMQP.BasicProperties().builder()
    .deliveryMode(1)     //指定消息书否需要持久化 1 - 需要持久化  2 - 不需要持久化
    .messageId(UUID.randomUUID().toString())
    .build();
String msg = "Hello-World!";
channel.basicPublish("","HelloWorld",true,properties,msg.getBytes());
- 消费者,在消费消息时,根据具体业务逻辑去操作redis
DefaultConsumer consume = new DefaultConsumer(channel){
    @Override
    public void handleDelivery(String consumerTag, Envelope envelope, AMQP.BasicProperties properties, byte[] body) throws IOException {
        Jedis jedis = new Jedis("192.168.199.109",6379);
        String messageId = properties.getMessageId();
        //1. setnx到Redis中,默认指定value-0
        String result = jedis.set(messageId, "0", "NX", "EX", 10);
        if(result != null && result.equalsIgnoreCase("OK")) {
            System.out.println("接收到消息:" + new String(body, "UTF-8"));
            //2. 消费成功,set messageId 1
            jedis.set(messageId,"1");
            channel.basicAck(envelope.getDeliveryTag(),false);
        }else {
            //3. 如果1中的setnx失败,获取key对应的value,如果是0,return,如果是1
            String s = jedis.get(messageId);
            if("1".equalsIgnoreCase(s)){
                channel.basicAck(envelope.getDeliveryTag(),false);
            }
        }
    }
};
3.2 SpringBoot应用避免重复消费
3.2.1 导入依赖
<dependency>
    <groupId>org.springframework.boot</groupId>
    <artifactId>spring-boot-starter-data-redis</artifactId>
</dependency>
3.2.2 编写配置文件
spring:
  redis:
    host: 47.96.11.185
    port: 6379
3.2.3 修改生产者
@Test
void contextLoads() throws IOException {
    CorrelationData messageId = new CorrelationData(UUID.randomUUID().toString());
    rabbitTemplate.convertAndSend("boot-topic-exchange","slow.red.dog","红色大狼狗!!",messageId);
    System.in.read();
}
3.2.4 修改消费者
@Autowired
private StringRedisTemplate redisTemplate;


@RabbitListener(queues = "boot-queue")
public void getMessage(String msg, Channel channel, Message message) throws IOException {
    //0. 获取MessageId
    String messageId = message.getMessageProperties().getHeader("spring_returned_message_correlation");
    //1. 设置key到Redis
    if(redisTemplate.opsForValue().setIfAbsent(messageId,"0",10, TimeUnit.SECONDS)) {
        //2. 消费消息
        System.out.println("接收到消息:" + msg);

        //3. 设置key的value为1
        redisTemplate.opsForValue().set(messageId,"1",10,TimeUnit.SECONDS);
        //4.  手动ack
        channel.basicAck(message.getMessageProperties().getDeliveryTag(),false);
    }else {
        //5. 获取Redis中的value即可 如果是1,手动ack
        if("1".equalsIgnoreCase(redisTemplate.opsForValue().get(messageId))){
            channel.basicAck(message.getMessageProperties().getDeliveryTag(),false);
        }
    }
}
9.RabbitMQ延迟机制(TTL)— SpringBoot
1.延迟队列概念
-
什么是延迟队列
- 延迟队列存储的对象肯定是对应的延时消息,所谓”延时消息”是指当消息被发送以后,并不想让消费者立即拿到消息,而是等待指定时间后,消费者才拿到这个消息进行消费。
-
RabbitMQ如何实现延迟队列?
-
RabbitMQ不支持延迟队列
-
AMQP协议和RabbitMQ队列==本身没有直接支持延迟队列功能==,但是可以通过TTL(Time To Live)特性模拟出延迟队列的功能。
-
-
消息的TTL(Time To Live)
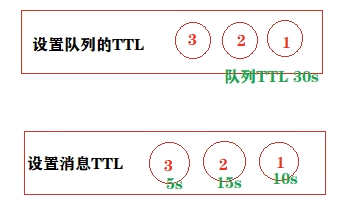
-
TTL就是消息的存活时间。 Rabbitmq可以分别对队列和消息设置存活时间
-
在创建队列的时候可以设置队列的存活时间,当消息进入到队列并且在存活时间内没有消费者消费,则此消息就会从当前队列被移除
-
创建消息队列没有设置TTL,但是消息设置了TTL,那么当消息的存活时间结束,也会被移除
-
当TTL结束之后,我们可以指定将当前队列的消息转存到其他指定的队列
-
-
实现延迟队列
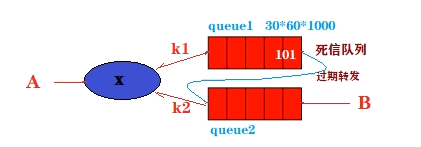
- 延迟任务通过消息的TTL来实现。我们需要建立2个队列,一个用于发送消息,一个用于消息过期后的转发目标队列。
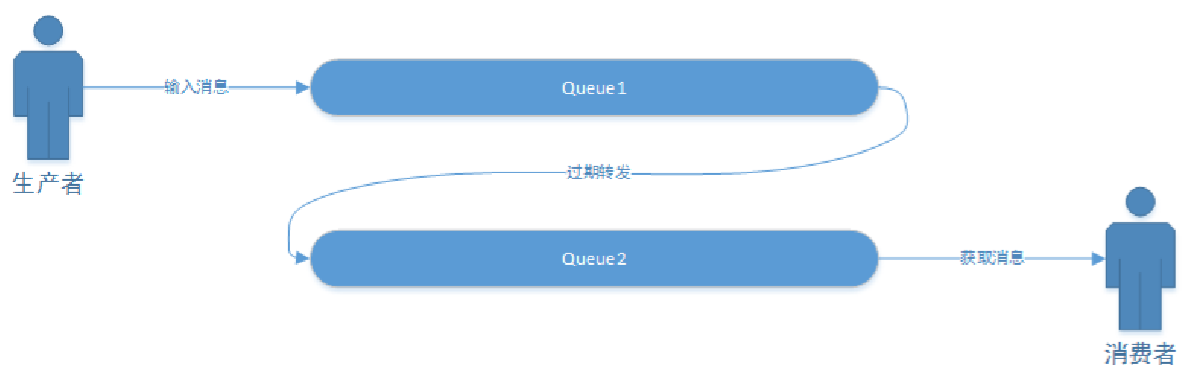
- 生产者输出消息到Queue1,并且这个消息是设置有有效时间的,比如60s。消息会在Queue1中等待60s,如果没有消费者收掉的话,它就是被转发到Queue2,Queue2有消费者,收到处理延迟任务。
2.创建延迟交换机
实现流程图
-
创建路由交换机
-
创建死信队列
-
创建死信转发队列
-
交换机队列绑定
延迟队列:
- 死信队列实现消息延迟肖息的提供者将消息发送到一个死信队列(1.设置了队列TTL,2.此队列没有消费者)
- 当死信队列的消息到达TTL存活时间,就或转发到指定的另一个队列
- 消息的消费者在另一个队列监听消息,进行消费
普通maven实现
consumer
package ppppp.mq;

import com.rabbitmq.client.*;

import java.io.IOException;

import static ppppp.mq.P2ApplicationTests.getConnection;

public class T_consumer {
    public static void main(String[] args) throws Exception {
        //创建一个新的连接
        Connection connection = getConnection();
        //创建一个通道
        Channel channel = connection.createChannel();

        // 告诉服务器我们需要那个频道的消息,如果频道中有消息,就会执行回调函数handleDelivery
        Consumer consumer = new DefaultConsumer(channel) {
            public void handleDelivery(String consumerTag, Envelope envelope,
                                       AMQP.BasicProperties properties, byte[] body)
                    throws IOException {
                String message = new String(body, "UTF-8");
                System.out.println("Customer Received '" + message + "'");
            }
        };
        //自动回复队列应答 -- RabbitMQ中的消息确认机制
        channel.basicConsume("queue_delay2", true, consumer);
    }

}
producer
package ppppp.mq;

import com.rabbitmq.client.Channel;
import com.rabbitmq.client.Connection;

import java.util.Scanner;

import static ppppp.mq.P2ApplicationTests.getConnection;

public class T_producer {

    public static void main(String[] args) throws Exception {
        Scanner scanner = new Scanner(System.in);
        String  msg = null;
        while (!"q".equalsIgnoreCase(msg=scanner.nextLine())){
            Connection connection = getConnection();
            Channel channel = connection.createChannel();
            String message = "Hello World ————" + msg;

            channel.basicPublish("delay_exchange", "k1", null, message.getBytes());
            channel.close();
            connection.close();
        }
    }

}
3.SpringBoot实现延迟队列
-
添加MQ依赖
<dependency> <groupId>org.springframework.boot</groupId> <artifactId>spring-boot-starter-amqp</artifactId> </dependency> <dependency> <groupId>org.springframework.amqp</groupId> <artifactId>spring-rabbit-test</artifactId> <scope>test</scope> </dependency> -
在application.yml配置RabbitMQ服务器连接属性
spring: application: name: mq-sender-demo rabbitmq: host: 47.96.11.185 port: 5672 username: ytao password: admin123 virtual-host: wfx_host # 手动ACK 不开启自动ACK模式,目的是防止报错后未正确处理消息丢失 默认 为 none listener: simple: acknowledge-mode: manual -
生产者
@Component @Slf4j public class RabbitProduct{ @Autowired private RabbitTemplate rabbitTemplate; public void sendDelayMessage(List<Integer> list) { //这里的消息可以是任意对象,无需额外配置,直接传即可 log.info("===============延时队列生产消息===================="); log.info("发送时间:{},发送内容:{}", LocalDateTime.now(), list.toString()); this.rabbitTemplate.convertAndSend( "delay_exchange", "delay_key", list, message -> { //注意这里时间要是字符串形式 message.getMessageProperties().setExpiration("60000"); return message; } ); log.info("{}ms后执行", 60000); } } -
消费者
@Component
@Slf4j
public class RabbitConsumer {
    @Autowired
    private CcqCustomerCfgService ccqCustomerCfgService;

    /**
     * 默认情况下,如果没有配置手动ACK, 那么Spring Data AMQP 会在消息消费完毕后自动帮我们去ACK
     * 存在问题:如果报错了,消息不会丢失,但是会无限循环消费,一直报错,如果开启了错误日志很容易就吧磁盘空间耗完
     * 解决方案:手动ACK,或者try-catch 然后在 catch 里面将错误的消息转移到其它的系列中去
     * spring.rabbitmq.listener.simple.acknowledge-mode = manual
     * @param list 监听的内容
     */
    @RabbitListener(queues = "receive_queue")
    public void cfgUserReceiveDealy(List<Integer> list, Message message, Channel channel) throws IOException {
        log.info("===============接收队列接收消息====================");
        log.info("接收时间:{},接受内容:{}", LocalDateTime.now(), list.toString());
        //通知 MQ 消息已被接收,可以ACK(从队列中删除)了
        channel.basicAck(message.getMessageProperties().getDeliveryTag(), false);
        try {
            dosomething.....
        } catch (Exception e) {
            log.error("============消费失败,尝试消息补发再次消费!==============");
            log.error(e.getMessage());
            /**
             * basicRecover方法是进行补发操作,
             * 其中的参数如果为true是把消息退回到queue但是有可能被其它的consumer(集群)接收到,
             * 设置为false是只补发给当前的consumer
             */
            channel.basicRecover(false);
        }
    }
}
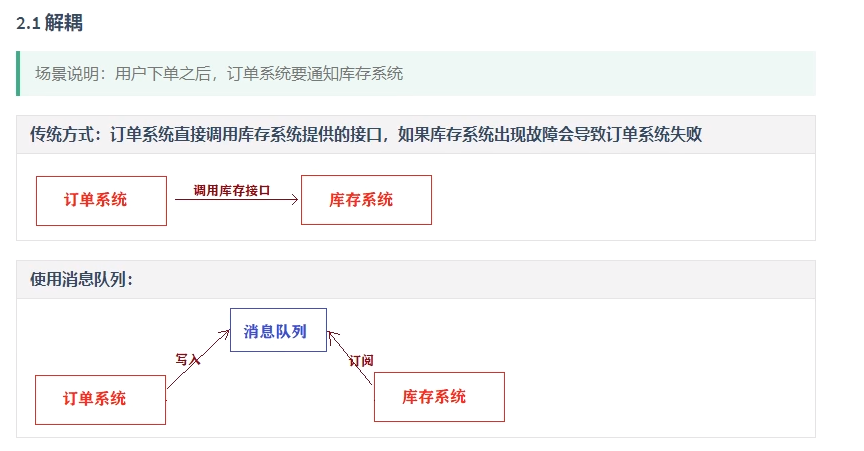
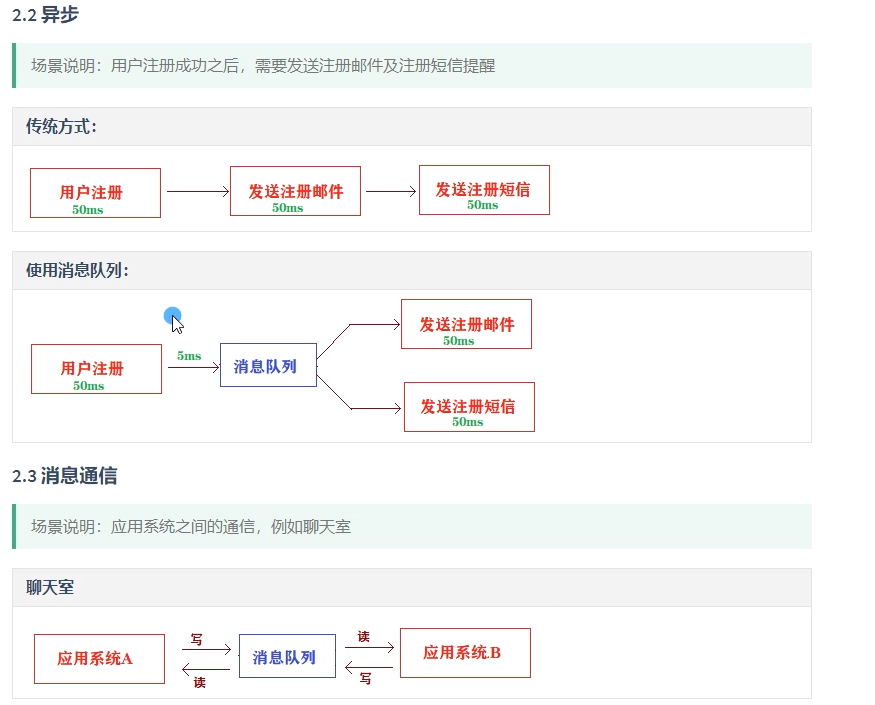
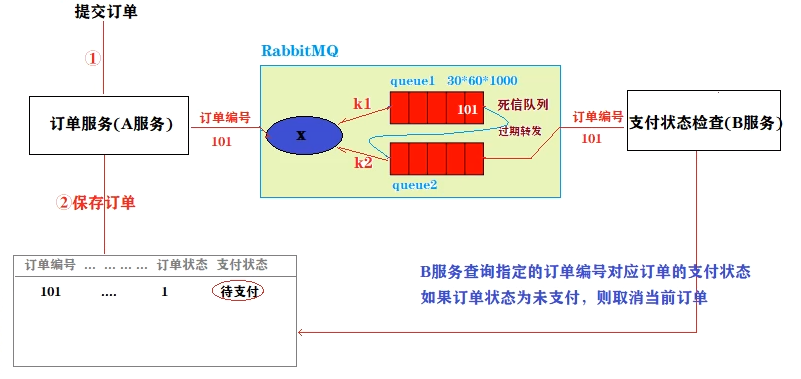
10.消息队列的应用场景